Website traffic is one of the most important elements in SEO strategy. Our social network traffic bot can increase bulk traffic for your website from links shared on various social network platforms such as Facebook, Twitter, etc. Therefore, you can rank your website on Google faster.
MAIN FEATURES OF SOCIAL NETWORK TRAFFIC BOT
- Auto increase bulk traffic for your website from shared links on social networks
- Can manage unlimited links
- Auto log into bulk accounts simultaneously
- Can use rotated proxy and Dcom
- Easy to set up, detailed tutorial
- Free and frequent update
HOW TO USE SOCIAL NETWORK TRAFFIC BOT
After you make payment for Social Traffic Bot, we will send you 3 links, including software link and useragent file links (Desktop and Mobile). You need to download these files, unzip the SocialTrafficBot.rar => double click on the SocialTrafficBot.exe to install the software.
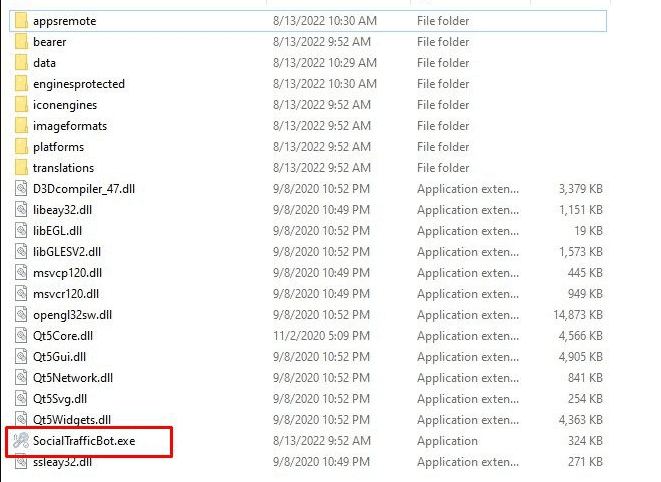
Then, you log into the software with provided License and Password.
This is the interface of Social Network Traffic Bot:
1. Run
You need to put the number of times that you want the Social Traffic Bot to run successfully into Run section. In case you put “999999” as the default, the Social Traffic software will run continuously till you stop it manually.
For example, if you put 1000 into Run section, the software will automatically stop after it runs 100 times successfully.

2. Threads
You enter the number of accounts that you want the software to run at the same time. You need to put the number of threads that match your computer configuration. The stronger your computer configuration is, the more threads the software can run simultaneously.
![]()
3. Proxy Source
The software will login many accounts at the same time, so you need to use proxy to avoid being locked out of accounts by Google.
You can rent safe and cheap proxy from this website https://saferproxy.com/
You can select one of 4 options at Proxy Source section
3.1. Use Dcom
If you want to use Dcom, you select Dcom at Proxy Source and attach the Dcom to your PC to run the software.

3.2. Proxy From Data
When you select From Data at Proxy source section, the Social Traffic Bot will use the proxy that you import in Gmail Accounts section (refer to 4.1. Gmail Accounts)

3.3. Proxy From File
In case you want to use proxy in text file or URL, you select From File at Proxy Source
Next, there are 2 options at List Proxy section for you to set up
- In case you select LinesFromFile, you need to create a text file to save the proxy in format: IP:Port:Proxy username (if any):Proxy Password (if any). Proxies need to be entered per line. Next, at List Proxy section, you click on
 => select the proxy file which had been created.
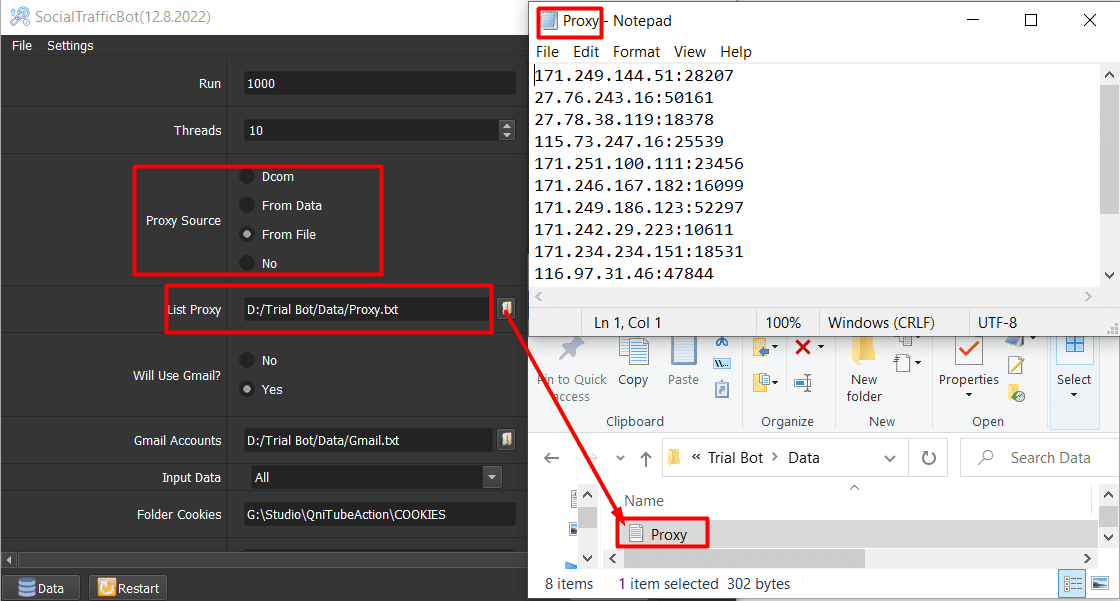
- If you select Lines From Url, you paste the proxy address link into List Proxy section as shown.

3.4. Do not use proxy
If you do not want to use proxy, you can select No at Proxy Source section. The software will use IP and Port of your computer to run. You should not select this option if you run the software with many accounts, because your Gmail accounts can be banned by Google.

4. Will Use Gmail? – Social Network Traffic Bot
In case you want to use Gmail, you select Yes at Will Use Gmail section.
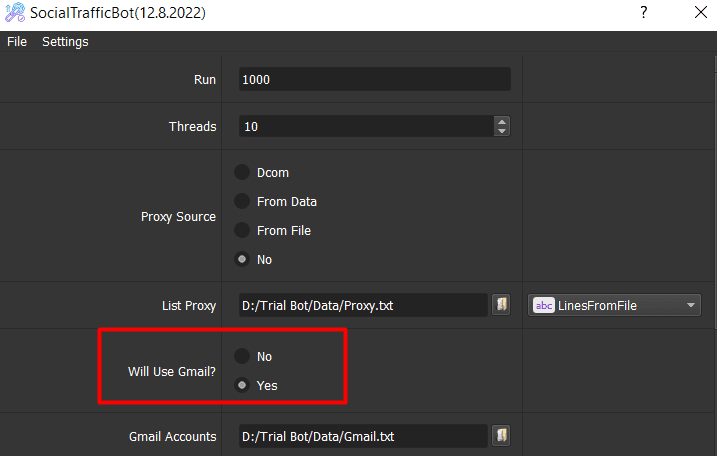
Next, you need to import Gmail Accounts or Gmail Cookies as follows
4.1. Gmail Accounts
You need to create a text file to save Gmail accounts one per line in format Gmail,Passwords,Recoverymail,IP (if any),Port (if any),Proxy username (if any),Proxy password (if any) =>at Gmail Accounts section, click on  icon > select the created text file of Gmail accounts.
Note: you import IP,Port,Proxy username (if any),Proxy password (if any) in case you select From Data at Proxy Source section.

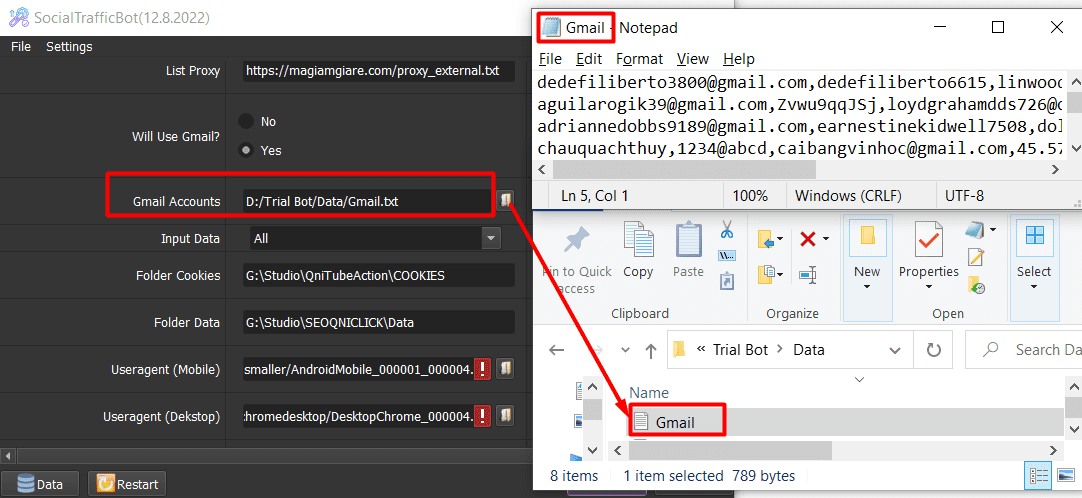
4.2. Gmail Cookies
If you rent Gmail Cookies from our company, we will provide you with a text file of Gmail Cookies. You need to download this Gmail Cookies text file => at Rented Cookies File section, click on  icon=> select the downloaded Gmail Cookies file. Also, select Yes at Will Rent Cookies section.
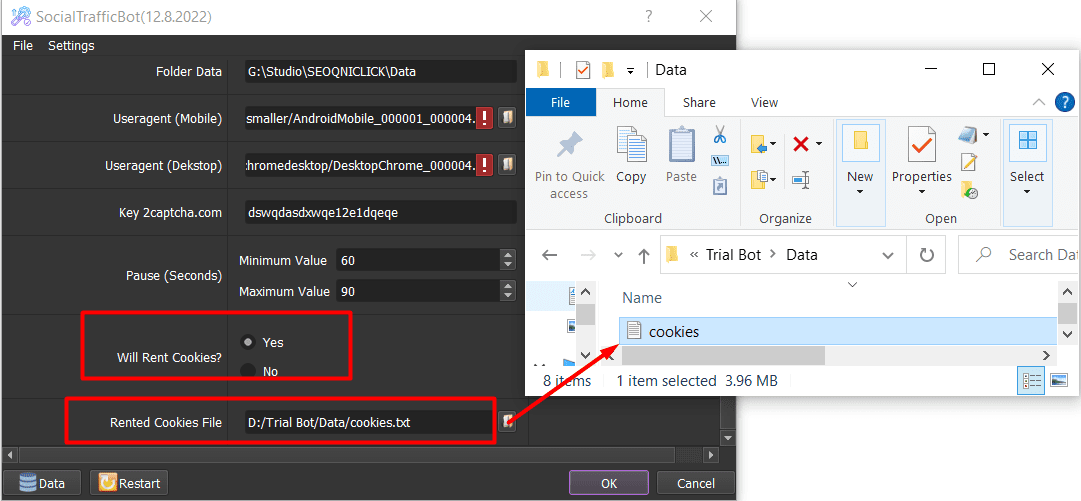
If you use Gmail accounts, you select No at Will Rent Cookies section.
5. Input Data – Social Network Traffic Software
You need to import data as the following instructions.
Firstly, you click on Data icon at the bottom left corner of Social Network Traffic interface => The Database Management dialog box will appear
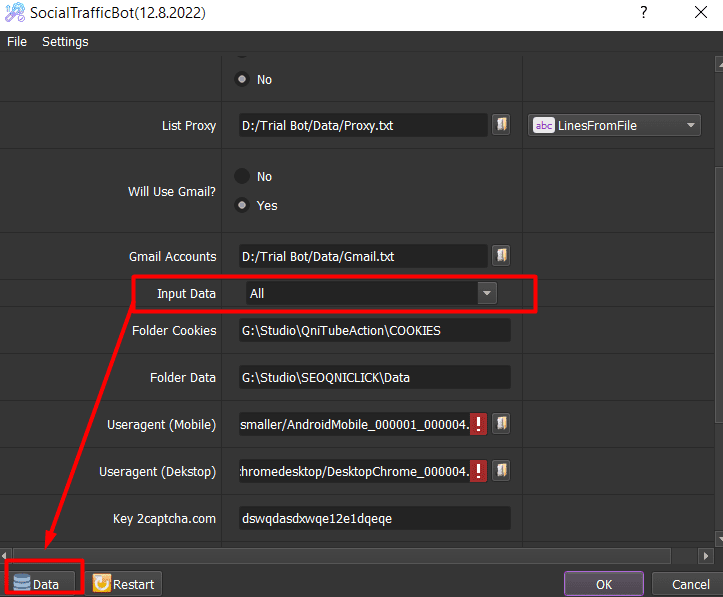
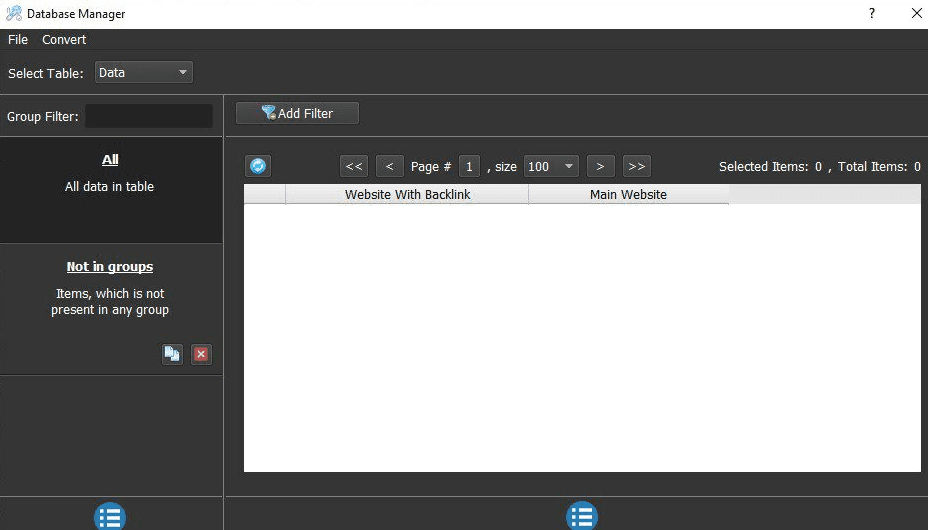
There are 2 methods to import data
5.1. Import data manually
To import data manually, you click on  on the left corner of the Database Management dialog box => select Add Group => Enter the group name.
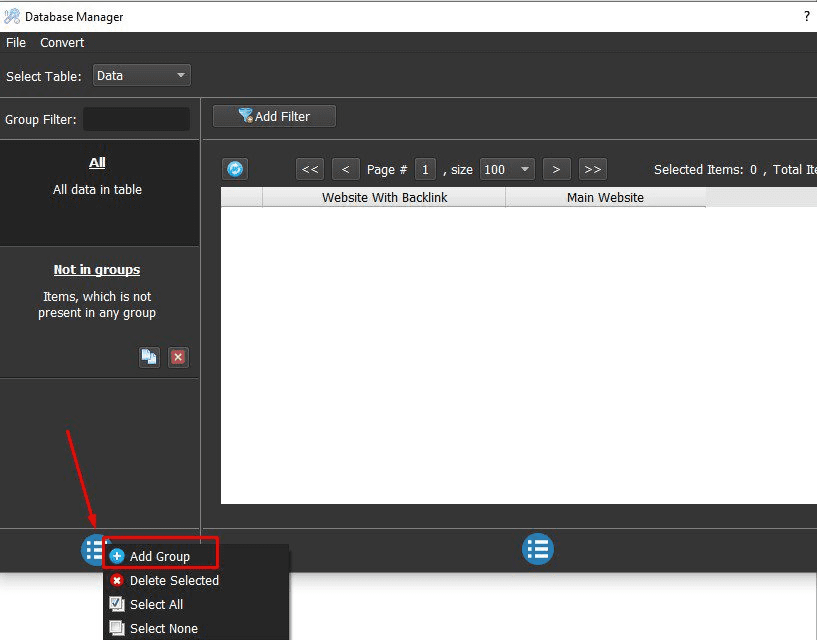
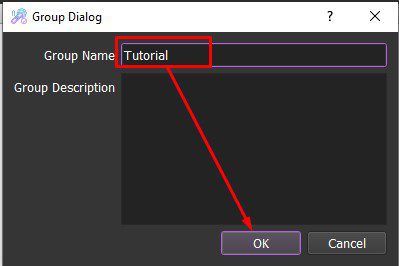
Next, you click on the group which has just been created=> click on ![]() icon on the right corner of the Database Management dialog box => click on Add Item => enter the data of Main Website and Website with BackLink (the link of posts on the social media network that you share your main website).
icon on the right corner of the Database Management dialog box => click on Add Item => enter the data of Main Website and Website with BackLink (the link of posts on the social media network that you share your main website).
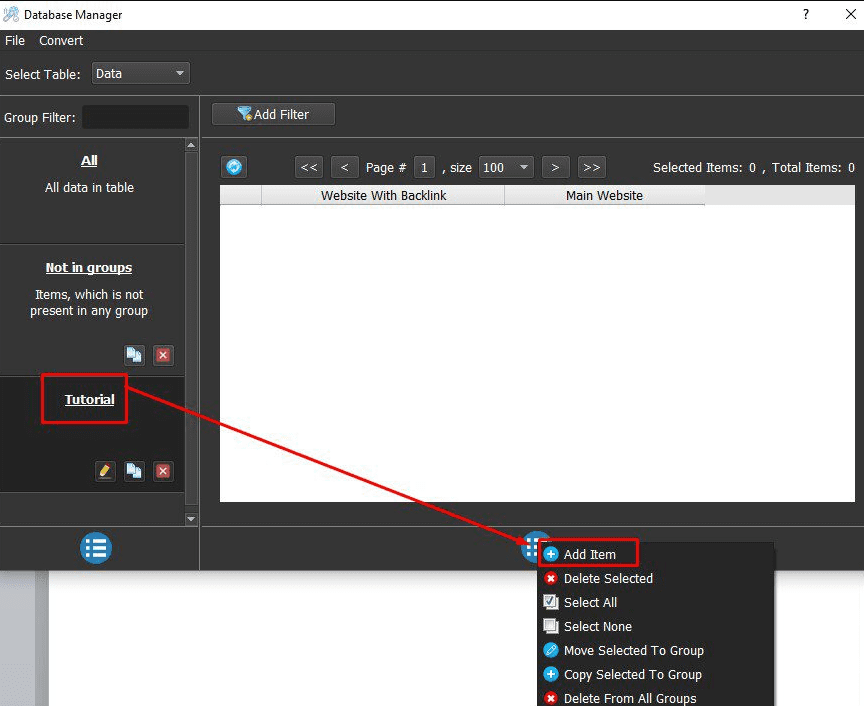
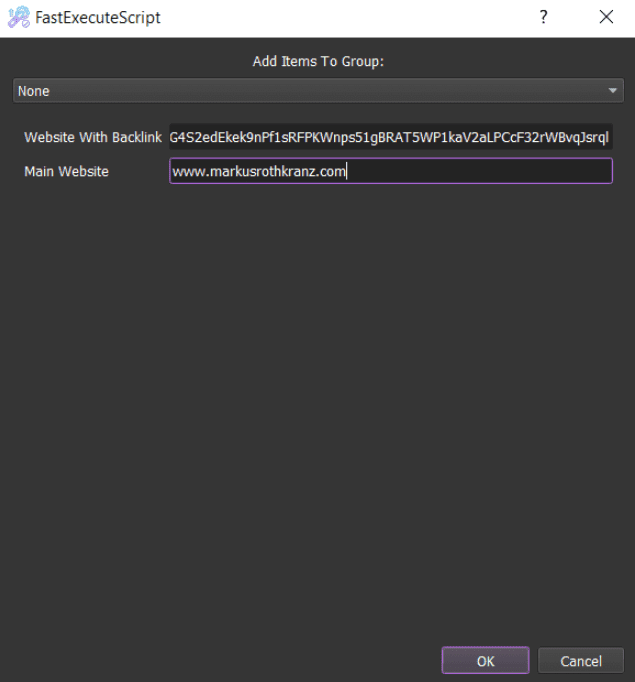
Note: Do not enter “http://” of the main websites.
Then, click OK.
Similarly, you can import many links as your need.
[thrive_leads id=’8342′]
5.2. Import a file
You need to create a text file to enter data per line, each line is in format “Website with BackLink”,Main Website
Note:
- Remember to put Website with BackLink into quotation mark (“).
- Website with Backlink is the link of post on the social media network that you share your main website

Then, select Convert in the Database Management dialog box=> select Import Csv => Click on ![]() icon => Select the text file of websites which has been created => Click OK.
icon => Select the text file of websites which has been created => Click OK.
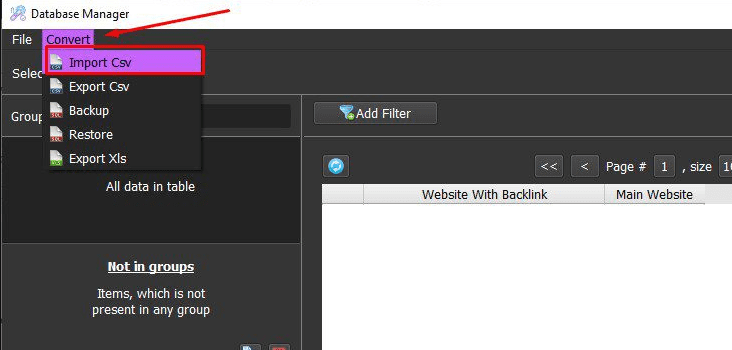
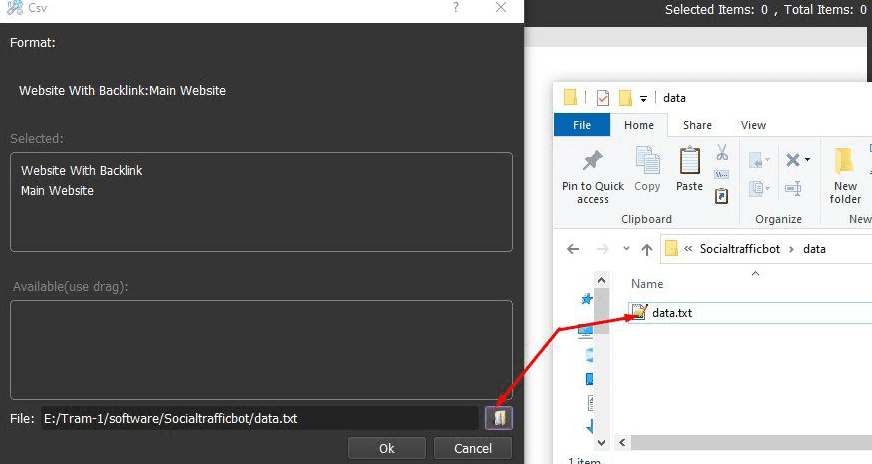
You will see these imported data in CSV group in Database Manager dialog box. Click on  icon if you want to rename this group in order to easily manage it.
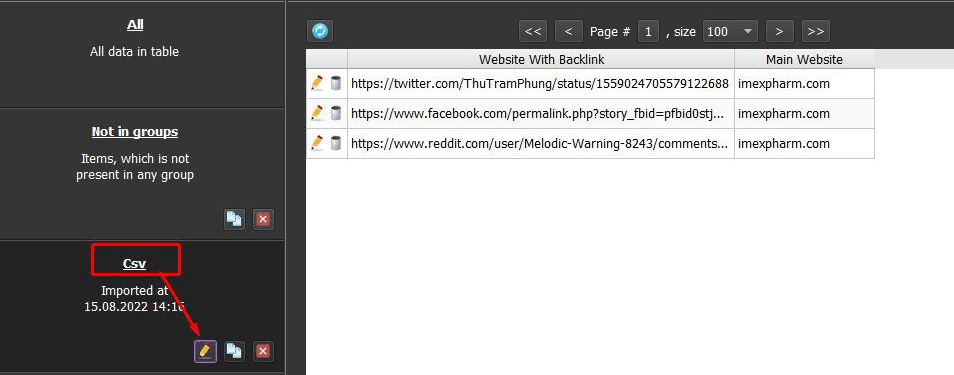
Next, close the Database Manager dialog box.
Then, at Input Data section, you select the group of data you want to use.

6. Folder Cookies and Folder Data
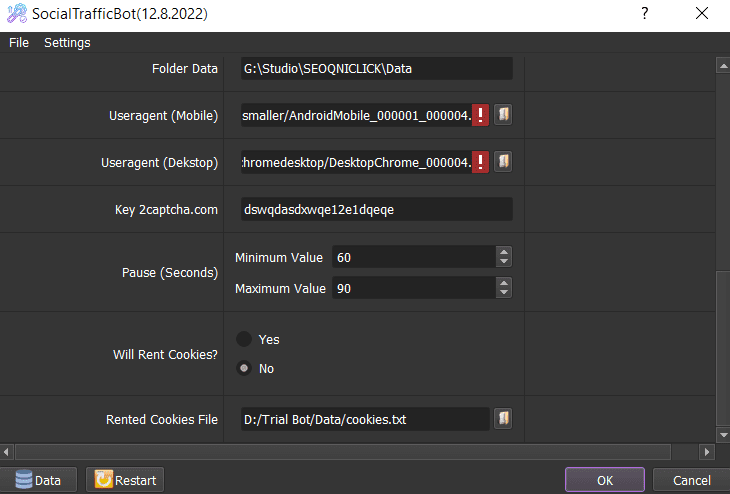
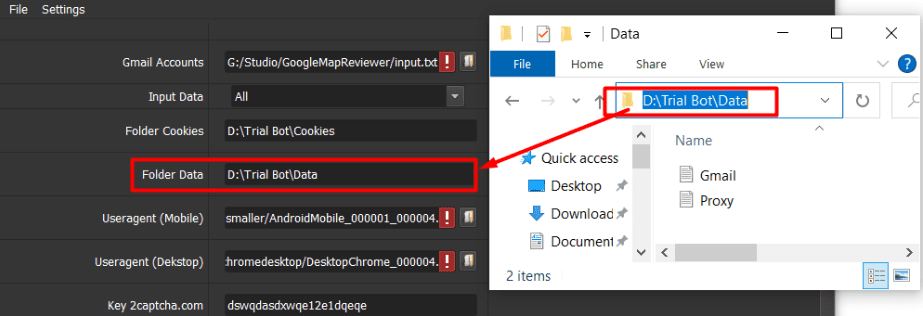
Folder Cookies will save cookies and profiles of Gmail accounts, so the software does not need to log into these accounts again in the next run. You need to create a new folder named Cookies => copy the path of created folder => paste it into the Folder Cookies section.
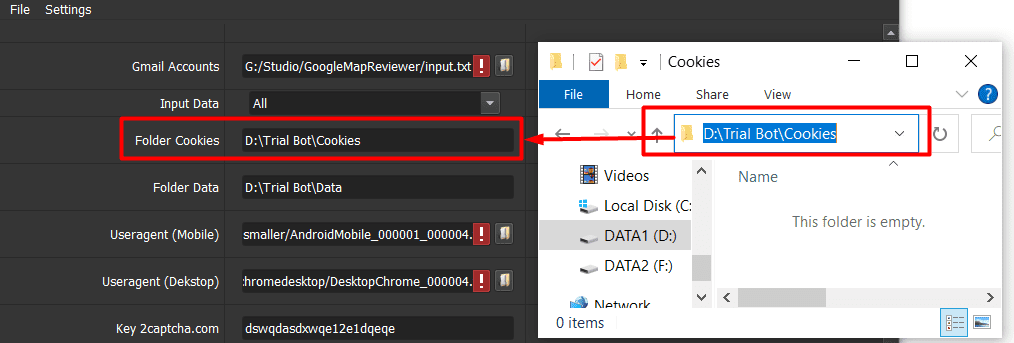 Create a new folder named Data => copy the path of created folder => paste it into the Folder Data section.
7. Useragent (Mobile) and Useragent (Desktop)
When you buy the software, we will send you 2 useragent links (Mobile and Desktop) => download these useragent files => click on  at Useragent (Mobile) & Useragent (Desktop) sections => select the corresponding useragent files that were downloaded.

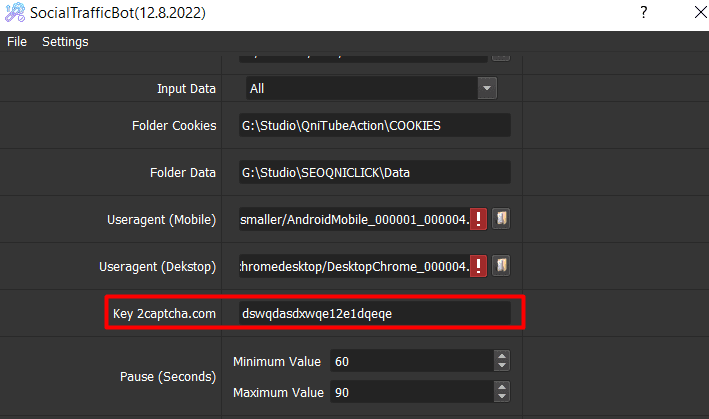
8. Key 2captcha.com
You need to create an account on 2captcha.com => put money into your account =>get the key and paste it into Key 2captcha.com section. The software will auto decode the captcha.
9. Pause (seconds) – Social Network Traffic Auto Tool
At Pause section, you enter the range of time that you want the software to simulate real users activities (surfing, moving the cursor, etc.) on websites.
Note: the unit is second.
For example, in case you set up Pause section as the following photo, the software will surf, move the cursor (as a real user is reading) on the Backlink Website in a random time from 50 to 70 seconds, then it will visit the main website and simulate a real visitor in a random time from 50 to 70 seconds.

Finally, click OK.
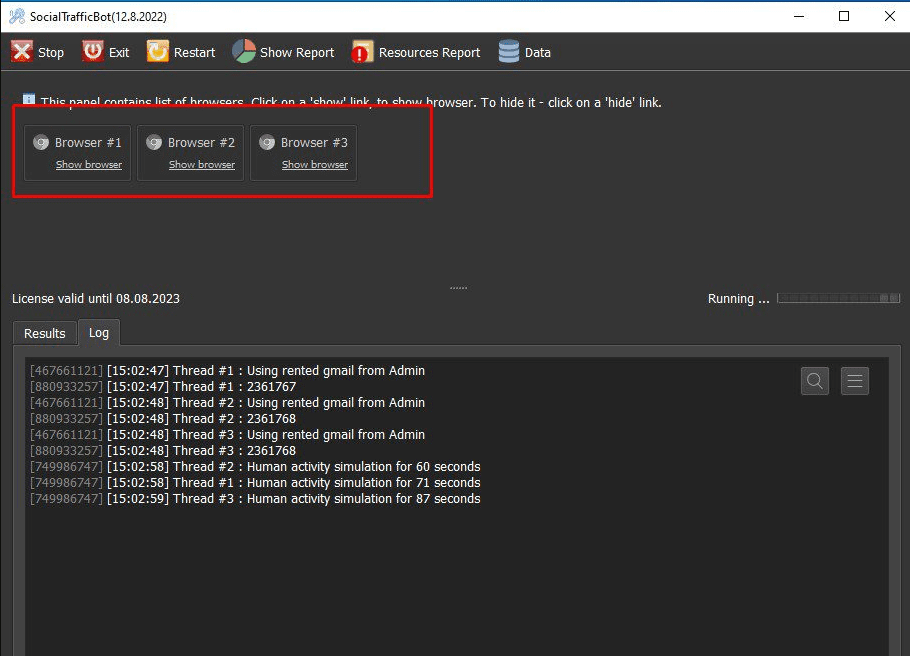
You can click on Show Browser to see how the Social Traffic Bot runs.
PRICE OF SOCIAL NETWORK TRAFFIC
For more details, kindly contact us at Autobotsoft – Top Marketing Software


